This is what we have been waiting for... and untethered jailbreak for iOS5.1
Firecore just released the untethered version of their jailbreak. so far i've been using the tethered jailbreak provided by firecore. i'm a little concerned that the new jailbreak will break my setup again since many people have complained that they can not install xbmc on it.
-- Update --
now that there is another untethered update i ventured and tried to update my atv2 to untethered jailbreak. since because of blackouts and stuff, i need to keep booting it up with my laptop.
i updated to the new season pass tool for my mac and then run it to generete the ipsw file. it did with no problem. but the season pass tool script to upload via itunes failed to execute properly. i read that the script does not work well with Mountain Lion. Since i know that season pass created the ipsw file in the same location as before. i just opened itunes and put the atv in dfu mode. next itunes recognized the "device in dfu mode" and presents the restore screen for the apple tv. so i just pressed the option key and clicked on the restore button. this opens finder so you can browse for the ipsw file. once you select the ipsw file you want to update then it just went on and try to restore the firmware.
some problems that i run into while doing the firmware update were the infamous errors 1602,1604 for 1602 i remembered that it had something to do with the apple server for firmware validation... so to solve that problem you have to check that the /etc/hosts file does not have the cidia ip address for the gs.apple.com dns. In my case it was put there by tiny umbrella application that i used to update the firmware earlier. once i removed the entry on the hosts file. the firmware update seemed to proceed, except that i got the 1604 error which seemed a little more odd since according to apple website means that there is a timing issue with the usb cable, so they just tell you to try a different port or a different cable. since i know that my cable is ok since i used it to flash the firmware before, then i was a little frustrated. but once method you can use to test your cable is to just let itunes restore the official firmware to the atv. that way if its successful, it means that your cable is good.
another reason to let it update the official firmware is to let the atv be in a 'good' state so when you go to flash it with the hacked firmware you just created with season pass then it should work correctly.
and i think that is what happened in my case, after like 10 different times trying to flash the season pass image, i flashed the official ipsw, then the next time i flashed the season pass ipsw it passes the point of failure.
after all this pain and suffering, you should back up your ipsw, your apple tv shsh file (tiny umbrella) and the xbmc catalog.
so until next time, its all couch surfing ....
Friday, May 25, 2012

Friday, May 11, 2012
setting up a bridge for your network
to bridge the gap between network devices that are not wireless n or to extend your network to other rooms or around the house without running ethernet cables around the house.... you can create a wireless bridge with a spare wireless n router and dd-wrt firmware. in my case I've accumulated some routers that i can use as wireless bridge. the first thing to do is to check if your wireless router is supported by looking it up in the dd-wrt database. Then follow the instructions to flash your routers and set them as wireless bridges. it is easy to do, but it requires to follow some technical instructions and sometimes patience since the instructions may be confusing.
this is my setup:
The main router is a Cisco-Linksys E3000 Wireless-N Router . since i flashed most of my routers to dd-wrt i decided to stick with it for the main router aswell, for consistency. It is capable of wireless n at 5 ghz and n,g at 2.4 ghz plus gigabit ethernet. Connected to it are a D-Link DNS-321 2-Bay Network Attached Storage
 at gigabit ethernet, Apple TV MC572LL/A (2010) [OLD VERSION]
 at wireless n 5ghz, a PC at wireless g 2.4 ghz, another PC at wireless n 5 ghz, a tablet wireless n 5 ghz and finally two wireless bridges. Bridge one is a Cisco-Linksys E2000 Advanced Wireless-N Router
 with dd-wrt (capable of wireless n at 5 ghz or 2.4 ghz) currently using 5 ghz. Connected to the bridge via ethernet are an Xbox 360 4GB Console
 and a playstation 2. The second bridge is a Cisco-Linksys WRT54G2 Wireless-G Broadband Router
 with dd-wrt (capable of wireless g at 2.4 ghz). Connected to this bridge via ethernet is a network printer.
Bridge three is currently in the works. Its an ASUS WL-520GU Wireless Router (capable of wireless g at 2.4 ghz) and i'm planning to connect a USB Camera to it. this router i've flashed with Open-wrt firmware and is currently a wifi radio.
this is my setup:
The main router is a Cisco-Linksys E3000 Wireless-N Router
. since i flashed most of my routers to dd-wrt i decided to stick with it for the main router aswell, for consistency. It is capable of wireless n at 5 ghz and n,g at 2.4 ghz plus gigabit ethernet. Connected to it are a D-Link DNS-321 2-Bay Network Attached Storage
at gigabit ethernet, Apple TV MC572LL/A (2010) [OLD VERSION]
at wireless n 5ghz, a PC at wireless g 2.4 ghz, another PC at wireless n 5 ghz, a tablet wireless n 5 ghz and finally two wireless bridges. Bridge one is a Cisco-Linksys E2000 Advanced Wireless-N Router
with dd-wrt (capable of wireless n at 5 ghz or 2.4 ghz) currently using 5 ghz. Connected to the bridge via ethernet are an Xbox 360 4GB Console
and a playstation 2. The second bridge is a Cisco-Linksys WRT54G2 Wireless-G Broadband Router with dd-wrt (capable of wireless g at 2.4 ghz). Connected to this bridge via ethernet is a network printer.Bridge three is currently in the works. Its an ASUS WL-520GU Wireless Router
(capable of wireless g at 2.4 ghz) and i'm planning to connect a USB Camera to it. this router i've flashed with Open-wrt firmware and is currently a wifi radio.
Thursday, May 10, 2012
Apple tv jailbreak IOS 5.1
It happened again, Apple TV crashed and in a desperate move to restore it, the newest iOS got installed. I was dreading my rush actions, so for a couple of weeks i kept postponing fixing the ATV... Lazyness, and also due to incompatibilities with the new iOS.
I really missed my awesome setup. So I decided to give it another shot and jailbreak the now Apple TV with iOS 5.1.
I started with searching on firecore.com website for the new season pass jailbreak tool, since I read the new iOS jailbreak had been released. After I searched for instructions on the procedure, I realized the new jailbreak is a tethered boot, which means that every time the ATV is cold boot started, it needs a computer to be attached by USB cable to boot up. The firecore.com website offers all the instructions necessary and the tool also can be used for the tethered boot after the jailbreak.
So the process went something like this...
I started the season pass jailbreak tool and clicked on create ispw button.
I waited for the tool to finish creating the jailbreaked image.
Then the tool asked to attach the ATV via micro USB cable.
After that the tool waits for the ATV to be in DFU mode, which you can accomplish by pointing the remote to the Apple TV and pressing the MENU and PLAY keys and holding them for 7 seconds. When the tool detects the ATV it loads a special boot loader.
Then the tool launches iTunes to load the image.
iTunes goes ahead and uncompressed the image and verifies the image with the Apple website.
Once the image is verified iTunes loads the image into the ATV.
After the load is complete the ATV is restarted.
Note: I did have problems and was getting 1600, 1604, etc error in iTunes, when loading the image, but it was because, i forgot that i have used tiny umbrella before and the hosts file of my machine was changed to point the gs.apple.com to the cydia website. and i was getting the error because of that. The solution was to comment out the entries tiny umbrella had made. and re download the ipsw image.
Now is time for the tethered boot.
I Pressed the tethered boot button on the tool and attach the power cable.
In order for the tool to detect the ATV, the MENU and PLAY buttons must be pressed again for 7 seconds.
This time the tool boots up the Apple TV with the new image.
You can double check the jailbreak by inspecting the settings button, which shape the firecore logo.
And that's it, the ATV is jail broken.
Next to install xbmc i checked the xbmc forum for the instructions.
I opened a secure shell to the apple tv and issued some command to install the xbmc app. These are the commands i used on the terminal.
ssh root@{apple tv address} <enter>
password <enter>
then entered each of these lines.
I really missed my awesome setup. So I decided to give it another shot and jailbreak the now Apple TV with iOS 5.1.
I started with searching on firecore.com website for the new season pass jailbreak tool, since I read the new iOS jailbreak had been released. After I searched for instructions on the procedure, I realized the new jailbreak is a tethered boot, which means that every time the ATV is cold boot started, it needs a computer to be attached by USB cable to boot up. The firecore.com website offers all the instructions necessary and the tool also can be used for the tethered boot after the jailbreak.
So the process went something like this...
I started the season pass jailbreak tool and clicked on create ispw button.
I waited for the tool to finish creating the jailbreaked image.
Then the tool asked to attach the ATV via micro USB cable.
After that the tool waits for the ATV to be in DFU mode, which you can accomplish by pointing the remote to the Apple TV and pressing the MENU and PLAY keys and holding them for 7 seconds. When the tool detects the ATV it loads a special boot loader.
Then the tool launches iTunes to load the image.
iTunes goes ahead and uncompressed the image and verifies the image with the Apple website.
Once the image is verified iTunes loads the image into the ATV.
After the load is complete the ATV is restarted.
Note: I did have problems and was getting 1600, 1604, etc error in iTunes, when loading the image, but it was because, i forgot that i have used tiny umbrella before and the hosts file of my machine was changed to point the gs.apple.com to the cydia website. and i was getting the error because of that. The solution was to comment out the entries tiny umbrella had made. and re download the ipsw image.
Now is time for the tethered boot.
I Pressed the tethered boot button on the tool and attach the power cable.
In order for the tool to detect the ATV, the MENU and PLAY buttons must be pressed again for 7 seconds.
This time the tool boots up the Apple TV with the new image.
You can double check the jailbreak by inspecting the settings button, which shape the firecore logo.
And that's it, the ATV is jail broken.
Next to install xbmc i checked the xbmc forum for the instructions.
I opened a secure shell to the apple tv and issued some command to install the xbmc app. These are the commands i used on the terminal.
ssh root@{apple tv address} <enter>
password <enter>
then entered each of these lines.
apt-get update

mkdir -p /Applications/AppleTV.app/Appliances

apt-get install org.xbmc.xbmc-atv2

mkdir -p /Applications/XBMC.frappliance

wget http://dl.dropbox.com/u/14341410/org.xbmc.xbmc-atv2_11.0-3_iphoneos-arm.deb

dpkg -i org.xbmc.xbmc-atv2_11.0-3_iphoneos-arm.deb

rm org.xbmc.xbmc-atv2_11.0-3_iphoneos-arm.deb Wednesday, January 4, 2012
Slow Context Menu on windows XP
I've been living in a world of pain, ever since my computer at work started to freeze or pause for a long time whenever i right clicked on the desktop or any folder for that matter. My workaround for the time being had been to open a command prompt and do what ever i needed Unix style.
Just today, i finally had some free time to look at this issue (myself) since IT disavowed me ;( last year around November...
The solution i found worked for my case. It consists of removing entries from the context menu via registry edits. the problem was that i had used some tools that resided on the network and somehow were added to the context menu with the network path. I discovered later that some of the network paths were no longer valid since some network folders were retired or moved from our network.
Google turned out some free tools available to scan my registry that allowed me to fix the problem.
i found these tools called Registry Scanner and Shell Menu New from NirSoft that worked very well.
I used the Registry Scanner to look for the Universal Naming Convention UNC symbol '\\' and this turned out all of the entries on my registry that had network paths on it. I noticed that it also picked up other entries, so i had to manually remove each invalid network path entry.
The Shell Menu New tool allowed me to clean up my new context menu to only show the items i most frequently use.
that is all... easy peace!!!
Just today, i finally had some free time to look at this issue (myself) since IT disavowed me ;( last year around November...
The solution i found worked for my case. It consists of removing entries from the context menu via registry edits. the problem was that i had used some tools that resided on the network and somehow were added to the context menu with the network path. I discovered later that some of the network paths were no longer valid since some network folders were retired or moved from our network.
Google turned out some free tools available to scan my registry that allowed me to fix the problem.
i found these tools called Registry Scanner and Shell Menu New from NirSoft that worked very well.
I used the Registry Scanner to look for the Universal Naming Convention UNC symbol '\\' and this turned out all of the entries on my registry that had network paths on it. I noticed that it also picked up other entries, so i had to manually remove each invalid network path entry.
The Shell Menu New tool allowed me to clean up my new context menu to only show the items i most frequently use.
that is all... easy peace!!!
Tuesday, December 13, 2011
Install Rosewill-RNX-MiniN1-RWLD-110001 usb network adapter in Ubuntu
Today, I received the usb Rosewill wireless adapter that i ordered, and plugged into my Ubuntu laptop, only to find that it did not work.
After finding out on blogs and the rosewill website, it seems that you have to compile the driver for your distro. However Rosewill makes it really easy, and provides a script that does all the work for you. All you have to do is download the driver zip file, unzip it and run the install script.
here is the link to the Rosewill 8192cu driver version 3.3.0_2971
1) download the driver
2) unzip
3) on the command line make the install.sh executable (chmod +x install.sh)
4) run the executable. (./install.sh)
wireless adapter that i ordered, and plugged into my Ubuntu laptop, only to find that it did not work.After finding out on blogs and the rosewill website, it seems that you have to compile the driver for your distro. However Rosewill makes it really easy, and provides a script that does all the work for you. All you have to do is download the driver zip file, unzip it and run the install script.
here is the link to the Rosewill 8192cu driver version 3.3.0_2971
1) download the driver
2) unzip
3) on the command line make the install.sh executable (chmod +x install.sh)
4) run the executable. (./install.sh)
Friday, December 9, 2011
Black and Decker Toaster cable is overheating
This is an easy one. (yes i know its kind of disgustingly dirty...)

But, recently, the toaster's cord got really hot every time after we used it and over time, the cord burned and the cable was exposed. I think its just the heavy use that has made the cord fragile, and pulling the cord when is hot is not a good idea...
so we started looking for the replacement, only to find out that today, they are even more cheaply made than lets say ten years ago and they are far more expensive for a decent toaster broiler.
So, i decided to replace the cord instead and save some bucks at the same time. For the cord replacement i used a generic computer power cord, since i have tons of them lying around. (not literal)
I began by cleaning the toaster, which is no longer easy to do ;). Then i opened it up, and looked at the cables and mechanism, since i don't want to mess anything up.

It turned out to be super easy, the power cord is attached to the toaster with sliding connectors. The brass one corresponds to the hot wire and the other one is the neutral wire.

So i cut up the computer cable, and found a black, white and green cables. then I did a quick lookup of the color coding. black is the hot wire, white is the neutral and green is ground. (standard US color coding)
so i cut up the original sliding connectors from the original cable and soldered then to the corresponding cables.
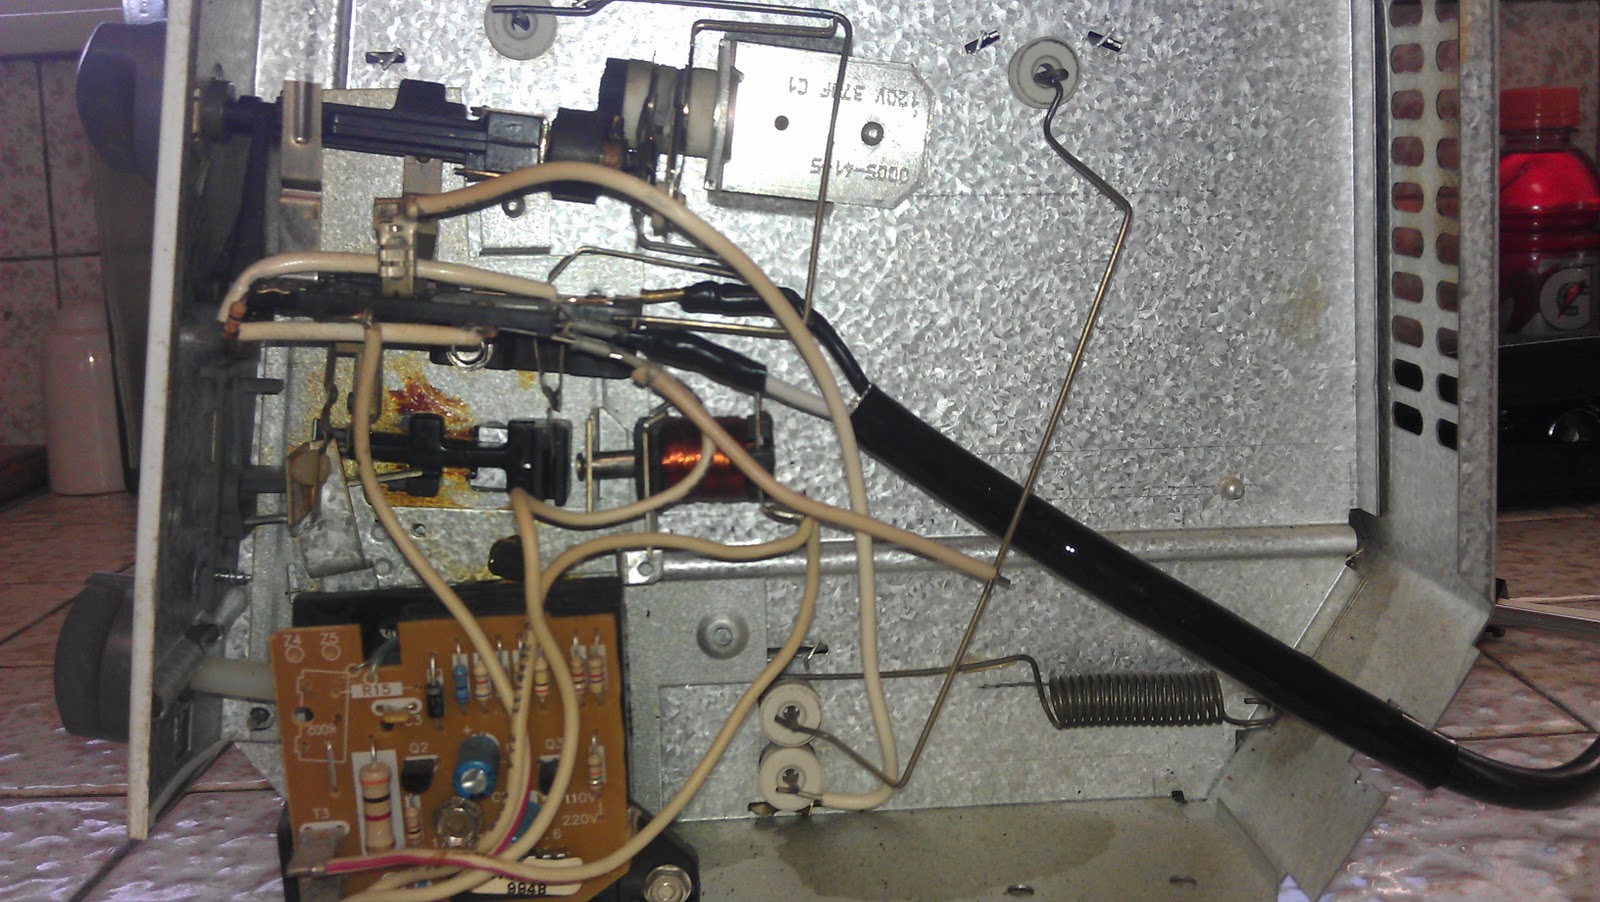
then connected them to the toaster and tested it out, before putting everything together and voila, everything works as expected.
Tuesday, November 15, 2011
wifi radio

  |
| TTL header to adapter to serial com port |

 The hardest part was to compile the image and flash it after we got he OpenWrt Source.( basically over writing the custom firmware OpenWRT to a ASUS WL-520GU Wireless Router
 ) Which in Leiman's terms becomes a Linux box.
  After the OpenWRT is installed, we can add programs to the router like a music player client and server; to play music via a usb sound card connected to some cheap pc speakers that i had laying around. The sound card is listed in the website as well. It is a pretty awesome project, like i said.
  The last part of the project which is not required since you can use your computer terminal to view the song information. For this we used an Arduino UNO board
 with a lcd screen. there are plenty of sample sketches to run on the Arduino uno with lcd, but you have to take in account that some are for 4 line lcd and there are some fancy sketches out there that can scroll the text if it is bigger than the screen size. we didn't connect any potentiometers (knobs) to the arduino to control volume or change stations, since we got a little lazy at the end.
These are pictures and video of our attempt to make this project. It was an amazing experience, one always wonder what can be done with this little router, and usb port... and my son and i had fun making it and this it is a cool project.
Subscribe to:
Posts (Atom)